Mastering Chocolate Pie with Chocolate Splash: Avoiding Common Pitfalls for Perfect Results
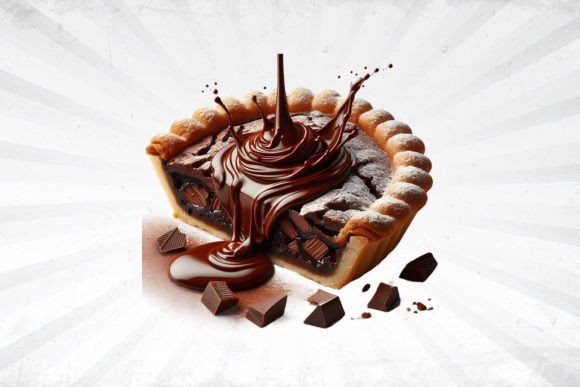
There is a distinct moment in dessert creation when ambition meets execution, and nowhere is this more apparent than when preparing a Chocolate Pie with Chocolate Splash. This dessert is not merely a pie; it is a structural and visual statement. The "splash" element refers to the dramatic, glossy ganache or glaze that cascades over the edges or pools artistically atop the filling, creating a sense of movement and indulgence. For home bakers, food bloggers, and culinary entrepreneurs, this dish represents a high-reward opportunity to showcase technical skill and aesthetic flair. However, the margin between a stunning centerpiece and a messy disappointment is surprisingly thin.
Many enthusiasts approach this recipe focusing solely on flavor profiles while neglecting the physics of viscosity and temperature. The result is often a pie that tastes excellent but fails visually or texturally. Understanding the specific mechanics behind the splash effect and the stability of the base is essential for anyone looking to serve, sell, or photograph this dessert successfully. By addressing common oversights early, you can ensure your Chocolate Pie with Chocolate Splash delivers both on the plate and in presentation.
The Misunderstanding of Viscosity and Temperature
The most frequent error occurs during the preparation of the splash component itself. Many recipes provide a generic ratio of chocolate to cream, but they fail to account for ambient temperature, chocolate brand variance, or the desired flow rate. A splash that is too hot will melt into the filling, destroying the distinct layers and creating a muddy appearance. Conversely, a glaze that has cooled too much will clump rather than cascade, resulting in an unappealing, lumpy surface that lacks the signature silky sheen.
To avoid this, treat the glaze as a precision ingredient rather than an afterthought. Use an instant-read thermometer to monitor the ganache. For a true splash effect that holds its shape without running off the plate entirely, aim for a temperature between 90°F and 95°F (32°C–35°C) before pouring. This range provides enough fluidity for movement while maintaining enough body to set quickly upon contact with the chilled pie. Always test the consistency on the back of a spoon or a small offset spatula before committing it to the finished product. If the ribbon breaks or drips too fast, adjust accordingly. Patience in this thirty-second window saves hours of regret.
Neglecting Structural Integrity of the Base
A spectacular splash cannot save a compromised foundation. A common oversight is using a crust or filling that lacks the density to support the weight of the glaze. Traditional custard pies may be too soft, causing the heavy chocolate layer to sink or slide off when sliced. This structural failure is particularly problematic for creators who need the pie to hold its form during photography or for caterers transporting the dessert to events.
Opt for a firmer base when planning a Chocolate Pie with Chocolate Splash. Dark chocolate ganache fillings, mousse stabilized with gelatin, or dense flourless cake layers provide the necessary resistance. If you prefer a softer custard, ensure it is thoroughly chilled and set before applying any glaze. Furthermore, consider the crust composition. A standard graham cracker crust can become soggy under the moisture of a glaze. Blind-baking the crust or brushing it with a thin layer of melted chocolate creates a moisture barrier, preserving that essential crisp texture against the smooth filling and glossy topping.
Overlooking Visual Composition and Negative Space
In the age of digital content, the visual appeal of a Chocolate Pie with Chocolate Splash is as important as its taste. A frequent mistake is over-glazing, where the entire surface is covered indiscriminately. While generous, this approach eliminates contrast and makes the dessert look monochromatic and heavy. It also hides the texture of the filling beneath, removing visual interest.
Embrace negative space. Allow portions of the matte filling or textured crust to remain visible. This contrast highlights the glossiness of the splash and guides the viewer’s eye across the dessert. When plating, consider the angle of the pour. A centered pool suggests elegance and symmetry, while an off-center cascade implies dynamic motion. For marketers and bloggers, these compositional choices significantly impact engagement. A well-composed image communicates professionalism and intentionality, whereas a haphazard glaze suggests a lack of refinement. Practice your pouring technique on a dummy cake or inverted bowl to build muscle memory before working with your final product.
Ingredient Quality and Cost Efficiency
Because the splash is the focal point, the quality of chocolate used directly dictates the final outcome. Using compound chocolate or chips containing stabilizers and vegetable oils instead of cocoa butter often results in a waxy mouthfeel and a dull finish that refuses to shine. While budget constraints are real, especially for small business owners, compromising on the primary flavor carrier is a false economy. The splash is what the consumer sees first and tastes last; it leaves the lasting impression.
You do not need to purchase the most expensive couverture chocolate to achieve professional results, but you must select couverture or high-quality baking bars with a cocoa butter content appropriate for glazing. Check the label for cocoa butter as a primary fat source. If cost is a major concern, blend a high-quality dark chocolate with a mid-range option to balance budget and performance. Additionally, proper tempering or the addition of a small amount of corn syrup or glucose can enhance shine and elasticity without requiring premium pricing. Investing time in understanding your ingredients yields better returns than simply buying the most expensive option blindly.
Storage and Service Logistics
The final area where execution often falters is post-production handling. A Chocolate Pie with Chocolate Splash is temperature-sensitive. Leaving it at room temperature for too long causes the glaze to bloom (develop white streaks) or weep, while refrigeration without proper covering can cause the glaze to absorb odors or develop condensation spots that ruin the mirror-like finish.
Plan your storage strategy before you begin baking. If serving within four hours, cool room temperature is acceptable provided the environment is climate-controlled. For longer storage, refrigerate uncovered for twenty minutes to set the glaze, then cover loosely with a dome or tented plastic wrap to prevent direct contact. Never wrap tightly against the surface. When serving, use a warm knife dipped in hot water and dried between cuts. This ensures clean slices that showcase the distinct layers and preserve the integrity of the splash design. Communicating these care instructions to clients or including them in blog posts adds significant value and demonstrates expertise, helping others avoid the frustration of a ruined finish after hours of effort.
Creating a successful Chocolate Pie with Chocolate Splash requires balancing artistry with food science. By respecting temperature thresholds, ensuring structural compatibility, composing with intention, selecting appropriate ingredients, and managing logistics, you transform a simple dessert into a reliable signature dish. These corrections move you beyond trial and error toward consistent, professional-quality results that satisfy both the palate and the eye.